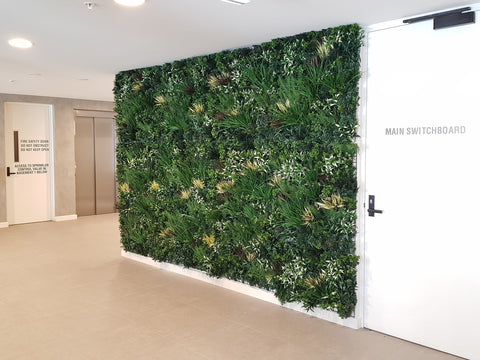
DIY Green wall installation on Gyprock
{% video_player "embed_player" overrideable=False, type='hsvideo2', hide_playlist=True, viral_sharing=False, embed_button=False, autoplay=False, hidden_controls=False, loop=False, muted=False, full_width=False, width='1920', height='1080', player_id='81980204113', style='' %}STEP 1. Prepare your space
Ensure your workspace is safe to install. Remove any unnecessary items from the floor and ensure the ground is a level surface if you are using a step ladder. Have the box of panels nearby and ready to use, along with all the tools you need.
STEP 2. Secure your first panel
Screw in your first panel, ensuring the greenery on the panel is facing upwards.
TIP: If you are installing this on your own, drill a screw halfway into the wall and hook the panel on, then screw in the top of the panel.
STEP 3. Secure your top row of panels
Going from left to right, screw each panel in at the top corners. For even foliage, ensure the second panel is between 1cm and 3cm from the first panels fixing hole for seamless greenery coverage. Too close together will bunch the foliage creating a line, too far apart and the wall will be visible.
Note: each box of green wall panels has a slight variation in greenery placement for a seamless look.
STEP 4. Secure your second row of panels
Clip on the first panel of the second row to the first panel of the first row, then screw in the panels. Note: Clipping on the panel before screwing ensures there are no buckles or folds in the panels. Continue this process ensuring your panels are level. Towards the end of this process, you may need to cut the panels to fit. All panels are modular meaning each panel is made up of smaller panels for easier modification. Cut along the lines using a sharp pair of scissors.
STEP 5. Unfurl your Green Wall
Ruffle the foliage to help the greenery decompress from its packaging. Over the next few days, the foliage will relax and look more full. Add your style pack/extra stems as desired. If your green wall is outdoors in an area with extreme weather or high foot traffic space, consider using cable ties to secure the stems. To view our additional stem options visit our shop online.
We encourage you to take before and after photos. Our team would love to see your handy work and feature your projects online. Feel free to send your pictures to info@evergreenwalls.com.au